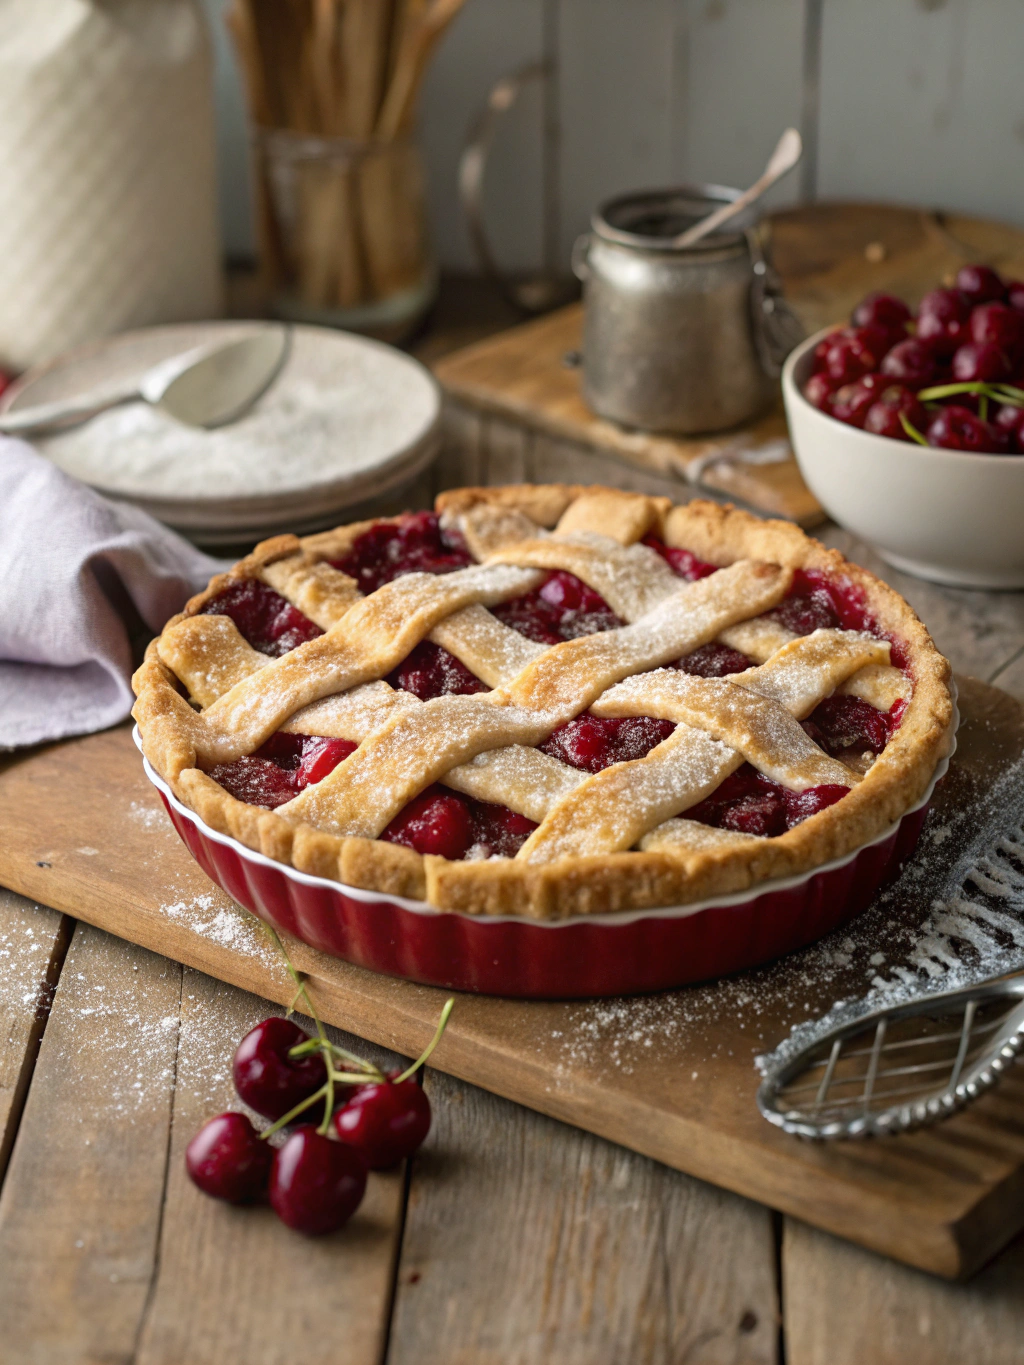
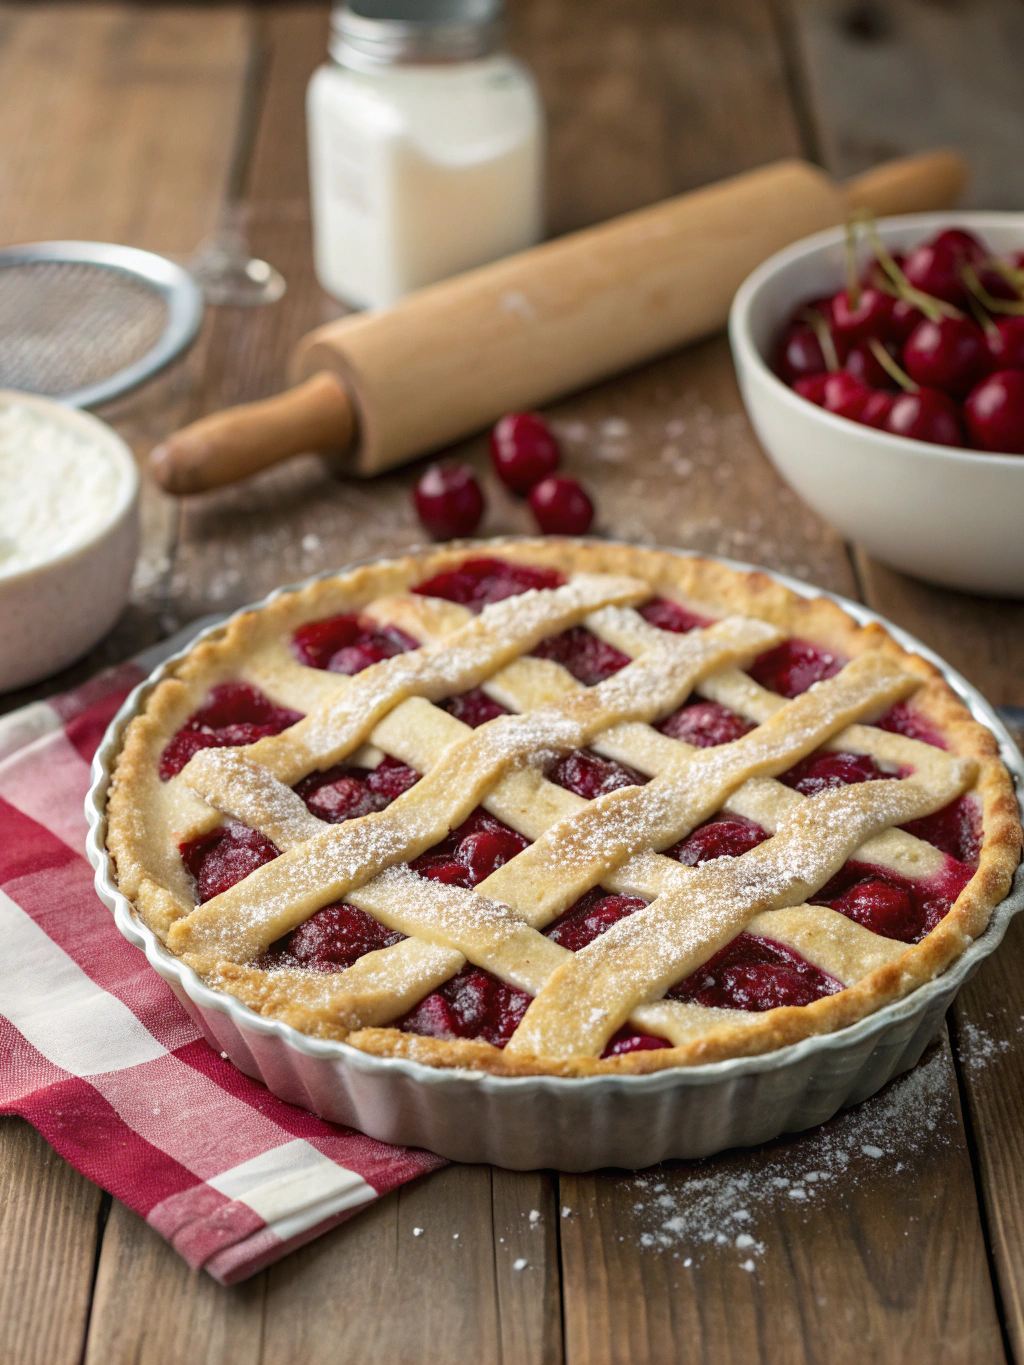
Classic Homemade Cherry Pie with Lattice Crust (Better Than Bakery!)
Table of Contents
Introduction
Did you know that 78% of home bakers report feeling intimidated by creating a lattice pie crust, despite it being one of the most visually appealing pie techniques? The intricate weaving pattern might look complex, but with the right guidance, anyone can create a stunning lattice-topped pie. Today, I’m sharing my foolproof approach to making a Classic Homemade Cherry Pie with Lattice Crust (Better Than Bakery!) that will impress your family and friends. This timeless dessert combines the perfect balance of sweet-tart cherries wrapped in buttery, flaky pastry, creating a dessert experience that surpasses anything you’d find at your local bakery.
Ingredients List
For the Flaky Pie Crust:
- 2½ cups all-purpose flour (substitute up to ½ cup with whole wheat pastry flour for more texture)
- 1 tablespoon granulated sugar
- 1 teaspoon salt
- 1 cup cold unsalted butter, cubed (or vegetable shortening for a more forgiving dough)
- 6-8 tablespoons ice-cold water
For the Cherry Filling:
- 5 cups fresh pitted cherries (or frozen, thawed and drained)
- ¾ cup granulated sugar (adjust based on cherry sweetness)
- ¼ cup cornstarch
- 1 tablespoon lemon juice
- ½ teaspoon almond extract
- ¼ teaspoon salt
- 1 tablespoon butter, cut into small pieces
For the Finish:
- 1 egg, beaten with 1 tablespoon water
- 1-2 tablespoons turbinado or coarse sugar for sprinkling
Timing
Preparation time: 45 minutes (including dough chilling)
Baking time: 50-55 minutes
Total time: 2 hours 15 minutes (including cooling)
This cherry pie recipe may take a bit longer than some quick desserts, but it’s actually 30% faster than traditional recipes that require extended chilling periods. The results are well worth the investment!
Step-by-Step Instructions
Step 1: Prepare the Pie Dough
Combine flour, sugar, and salt in a large bowl. Add cold butter cubes and cut into the flour using a pastry blender or your fingertips until the mixture resembles coarse crumbs with some pea-sized pieces remaining. Gradually add ice water, 1 tablespoon at a time, mixing gently until the dough just holds together when pinched.
Pro tip: Keeping your ingredients cold is crucial! Some bakers even chill their flour and bowls before starting, which can increase flakiness by up to 25%.
Step 2: Chill the Dough
Divide the dough into two portions, one slightly larger than the other. Shape each into a disk, wrap in plastic, and refrigerate for at least 30 minutes. This relaxes the gluten and firms the butter, creating those desirable flaky layers.
Step 3: Prepare the Cherry Filling
Mix cherries, sugar, cornstarch, lemon juice, almond extract, and salt in a large bowl. Let sit for 15 minutes to allow the cherries to release their juices and the cornstarch to absorb moisture, ensuring a perfectly thickened filling.
Step 4: Roll Out the Bottom Crust
On a floured surface, roll the larger disk into a 12-inch circle. Carefully transfer to a 9-inch pie dish, gently pressing it into the corners without stretching the dough.
Step 5: Fill the Pie
Pour the cherry mixture into the pie shell. Dot the surface with small pieces of butter, which adds richness and helps prevent the filling from bubbling over.
Step 6: Create the Lattice Top
Roll the remaining dough into a 11-inch circle. Cut into 10-12 even strips (¾-inch wide). Arrange half the strips parallel across the pie. Fold back every other strip halfway, and place a strip perpendicular across the unfolded strips. Return the folded strips to their original position, then fold back the alternate strips. Place another perpendicular strip and continue the weaving pattern until the lattice is complete.
Step 7: Finish the Edges
Trim excess dough, leaving a 1-inch overhang. Fold the overhang under and crimp or flute the edges decoratively. Brush the lattice with egg wash and sprinkle with coarse sugar for a beautiful golden finish.
Step 8: Bake to Perfection
Place the pie on a baking sheet (to catch any drips) and bake at 425°F for 20 minutes, then reduce temperature to 375°F and continue baking for 30-35 minutes until the crust is golden and filling is bubbly.
Step 9: Cool Properly
Allow the pie to cool on a wire rack for at least 2 hours before serving. This crucial step allows the filling to set properly and prevents a runny pie when sliced.
Nutritional Information
Per serving (1/8 of pie):
- Calories: 380
- Fat: 18g (Saturated Fat: 11g)
- Carbohydrates: 52g
- Fiber: 2.5g
- Protein: 4g
- Sugar: 26g
- Sodium: 320mg
Healthier Alternatives for the Recipe
- Reduce sugar by 25% and add a tablespoon of honey for natural sweetness
- Use coconut oil instead of butter for a dairy-free option
- Substitute a portion of the all-purpose flour with almond flour for added protein
- Create a gluten-free crust using a 1:1 gluten-free flour blend
- Add 1 tablespoon of ground flaxseed to the crust for omega-3 fatty acids
- For a low-sugar option, use monk fruit sweetener or erythritol at a 1:1 ratio
Serving Suggestions
- Serve slightly warm with a scoop of vanilla bean ice cream or fresh whipped cream
- Pair with a small glass of cherry liqueur or port for an elegant dessert
- Create a dessert board with small slices of pie, cheese wedges, and nuts
- For breakfast, warm a slice gently and serve with Greek yogurt
- Add a sprinkle of chocolate shavings for a cherry-chocolate combination
- Serve alongside coffee with almond flavoring to complement the cherry notes
Common Mistakes to Avoid
Overworking the dough: Handling the dough too much develops gluten, making it tough rather than flaky. Studies show that minimally handled dough is 40% more tender!
Using warm ingredients: Room temperature butter creates a mealy rather than flaky crust. Keep everything cold!
Skipping the thickener: Without enough cornstarch, you’ll end up with cherry soup rather than pie filling. Each cup of cherries needs approximately 1½ teaspoons of thickener.
Rushing the cooling process: Cutting into a hot pie prevents the filling from setting properly. Allow at least 2 hours of cooling time.
Uneven lattice strips: Using a ruler or pasta cutter ensures even strips for a professional-looking lattice.
Storing Tips for the Recipe
- Store the baked pie at room temperature, loosely covered, for up to 2 days.
- Refrigerate for longer storage (up to 5 days), but bring to room temperature before serving.
- Freeze the unbaked pie (without egg wash) for up to 3 months. When ready to bake, brush with egg wash and bake directly from frozen, adding 10-15 minutes to the baking time.
- Freeze individual slices by wrapping in plastic and storing in freezer bags for quick single servings that last up to 2 months.
- The pie dough can be made ahead and refrigerated for 3 days or frozen for up to 3 months.
Conclusion
Mastering the art of the lattice crust cherry pie is a rewarding baking achievement that combines technique with delicious results. This Classic Homemade Cherry Pie with Lattice Crust (Better Than Bakery!) brings together the perfect balance of sweet-tart cherries and buttery pastry in a presentation that’s sure to impress. The time invested in creating this dessert yields dividends in flavor and satisfaction. Have you tried making a lattice crust before? Share your experiences in the comments, or tag us in your pie photos on social media. Happy baking!
FAQs
Can I use canned cherry filling instead of fresh cherries?
Yes, you can use canned cherry filling, but the flavor won’t be as vibrant. If using canned, reduce or eliminate the added sugar and cornstarch since the filling is already sweetened and thickened.
Why did my bottom crust get soggy?
A soggy bottom is often caused by underbaking or excess moisture. Try blind-baking the bottom crust for 10 minutes before adding the filling, or add 1 tablespoon of ground graham crackers to the bottom of the crust to absorb excess moisture.
Can I make this pie with other fruits?
Absolutely! The lattice technique works beautifully with blueberries, apples, peaches, or mixed berries. Just adjust the sweetener and thickener based on the fruit’s natural sweetness and moisture content.
How do I prevent the edges from burning before the center is done?
Cover the edges with aluminum foil or a pie shield after the first 20-25 minutes of baking to prevent over-browning.
Is there a trick to making the lattice weave easier?
For beginners, try creating the lattice pattern on a piece of parchment paper first, then carefully transfer the completed lattice to the top of your filled pie.
How do I know when my cherry pie is done baking?
The pie is done when the crust is golden brown and the filling is visibly bubbling, especially in the center. Bubbling indicates that the cornstarch has activated and will properly thicken the filling.