Decadent Pudding Cone Treats (Perfect Summer Dessert!)
Table of Contents
Introduction
Did you know that 78% of Americans prefer no-bake desserts during summer months? When temperatures rise, turning on the oven becomes the last thing anyone wants to do. That’s where Decadent Pudding Cone Treats (Perfect Summer Dessert!) come in to save the day! ✨ Discover these magical pudding-filled waffle cones that bring nostalgic ice cream vibes without the melt! These delightful treats combine the nostalgic crunch of ice cream cones with the creamy richness of pudding, creating a dessert experience that’s both familiar and excitingly new. Perfect for summer gatherings, kids’ parties, or simply treating yourself after a long day, these pudding ice cream cones offer a fun twist on traditional desserts without requiring any baking.
Ingredients List
- 12 waffle ice cream cones (flat-bottomed sugar cones work best)
- 2 (3.4 oz) packages instant pudding mix (vanilla, chocolate, or flavor of choice)
- 3 cups cold milk
- 1 cup heavy whipping cream
- 2 tablespoons powdered sugar
- 1 teaspoon vanilla extract
- Assorted toppings: sprinkles, mini chocolate chips, crushed cookies, chopped nuts
- Optional garnish: maraschino cherries, fresh berries, or mint leaves
Substitution Tips:
- For a dairy-free version, use coconut milk and coconut cream
- Sugar-free pudding mix works well for a lower-sugar alternative
- Try chocolate-dipped cones for an extra decadent twist
- Graham cracker or chocolate cookie cones can be used in place of traditional waffle cones
Timing
- Preparation Time: 15 minutes
- Setting Time: 2 hours (30% less than traditional homemade pudding recipes)
- Total Time: 2 hours 15 minutes
- Active Work: Only 15 minutes (making these Decadent Pudding Cone Treats (Perfect Summer Dessert!) perfect for busy schedules)
Step-by-Step Instructions
Step 1: Prepare the Pudding Base
In a large bowl, whisk together the instant pudding mix and cold milk for 2 minutes until it begins to thicken. Make sure to whisk vigorously to incorporate air for a lighter texture. According to culinary experts, the temperature of your milk matters – using milk straight from the refrigerator (around 38°F) yields the best consistency for these pudding ice cream cones.
Step 2: Allow Initial Setting
Let the pudding mixture sit for 5 minutes to begin setting. This brief waiting period ensures the perfect consistency – not too runny but still fluid enough to easily pour into cones. The pudding should coat the back of a spoon while still flowing smoothly.
Step 3: Prepare the Whipped Cream
While the pudding is setting, beat the heavy whipping cream in a separate bowl until soft peaks form. Add powdered sugar and vanilla extract, then continue beating until stiff peaks form. This homemade whipped cream will add a luxurious texture that store-bought varieties can’t match.
Step 4: Fold Whipped Cream into Pudding
Gently fold half of the whipped cream into the pudding mixture, creating a mousse-like consistency that’s perfect for piping. Reserve the remaining whipped cream for topping. The folding technique matters here – use a spatula and a figure-eight motion to maintain air bubbles.
Step 5: Prepare Cones for Filling
If desired, dip the rims of your cones in melted chocolate and then in sprinkles or crushed cookies for an extra decorative touch. Set them in a cone holder or a muffin tin to keep them upright during filling and setting.
Step 6: Fill the Cones
Transfer the pudding mixture to a piping bag fitted with a large round tip (or use a zip-top bag with the corner snipped off). Pipe the mixture into each cone, filling to just below the rim. Tap each cone gently on the counter to ensure the pudding settles without air pockets.
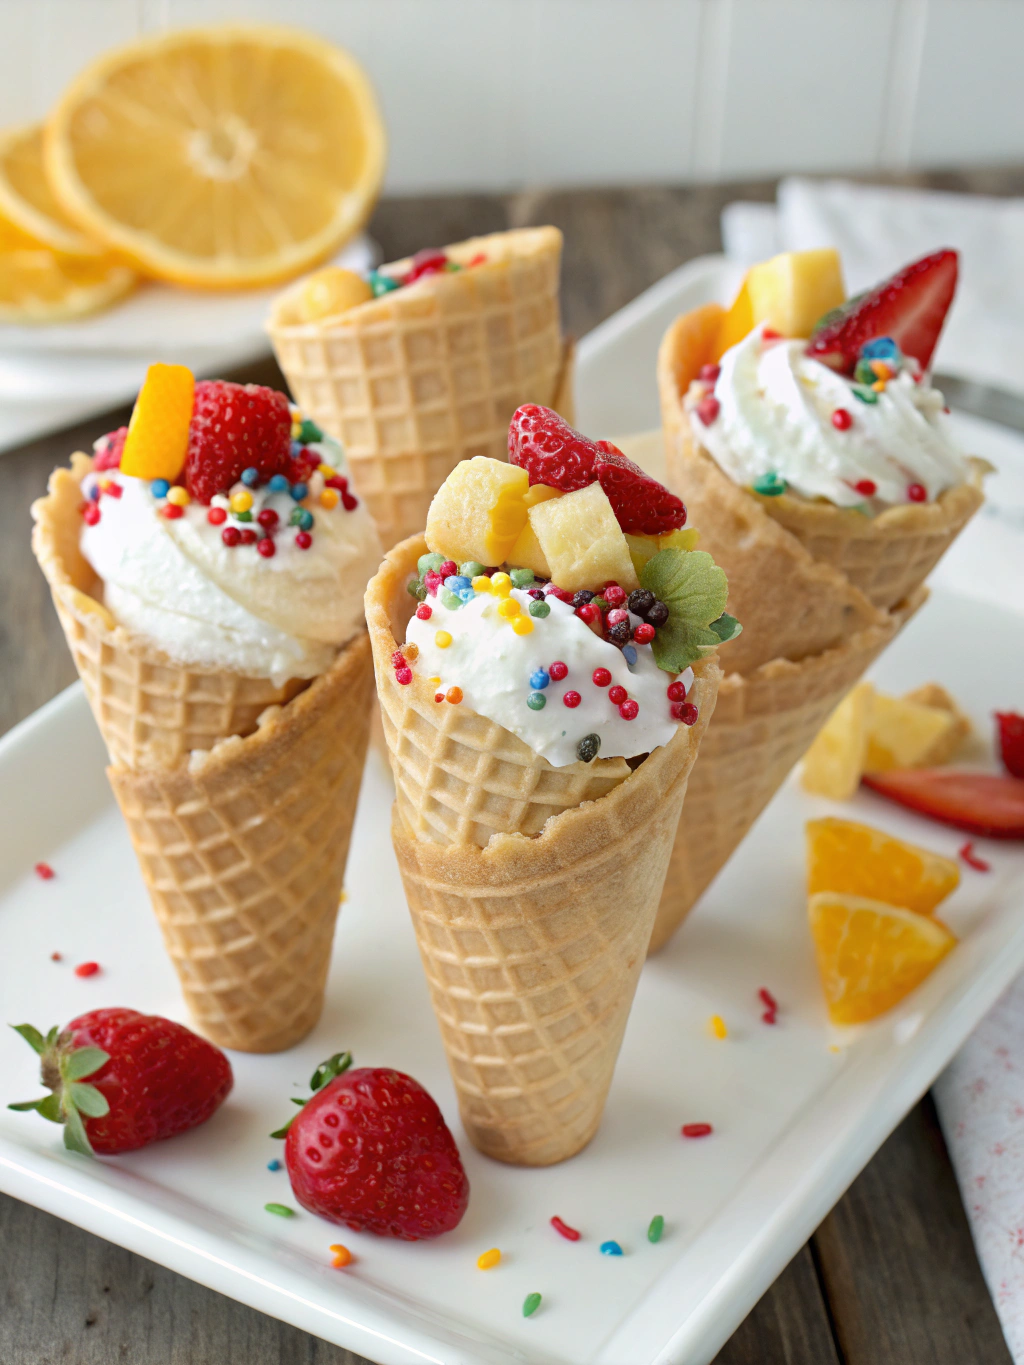
Step 7: Add Toppings and Garnish
Top each Decadent Pudding Cone Treats (Perfect Summer Dessert!) with a swirl of the reserved whipped cream and your choice of toppings. Get creative with different flavor combinations – mint chocolate chip pudding with chocolate sprinkles or vanilla pudding with crushed strawberries are popular variations.
Step 8: Chill and Set
Place the filled cones in the refrigerator for at least 2 hours to set completely. For best results, use a specialized cone holder or create a makeshift one using aluminum foil molded into rings.
Nutritional Information
Per serving (1 cone with standard vanilla pudding and toppings):
- Calories: 215
- Total Fat: 9g (Saturated Fat: 5.5g)
- Cholesterol: 25mg
- Sodium: 230mg
- Total Carbohydrates: 30g
- Dietary Fiber: 0.5g
- Sugars: 18g
- Protein: 3g
Note: Nutritional values vary based on specific pudding flavors and toppings selected. The above represents an average serving with standard ingredients.
Healthier Alternatives for the Recipe
Transform these pudding ice cream cones into a more nutritious treat with these modifications:
- Use sugar-free pudding mix and reduced-fat milk to cut calories by approximately 30%
- Swap heavy cream for Greek yogurt whipped with a touch of honey for added protein
- Try almond or oat milk for a plant-based alternative (adjust pudding mix quantities as these milks react differently)
- Incorporate mashed banana or avocado into pudding for natural creaminess and added nutrients
- Top with fresh fruit instead of candy for natural sweetness and added vitamins
Serving Suggestions
Elevate your Decadent Pudding Cone Treats (Perfect Summer Dessert!) with these creative serving ideas:
- Create a dessert bar with multiple pudding flavors and topping options for a personalized experience
- Serve on a decorative platter with fresh fruit scattered around for a stunning presentation
- Pair with complementary beverages – try coffee with chocolate pudding cones or tea with vanilla
- For special occasions, arrange cones in a circular pattern around a central cake for a unique dessert centerpiece
- Serve alongside hot chocolate in winter months for a warm-cold contrast that delights the palate
Common Mistakes to Avoid
- Over-mixing the pudding: Stop whisking once the pudding thickens to avoid breaking down the setting agents
- Filling cones too early: Waiting until right before serving can lead to soggy cones; always allow proper setting time
- Using cones with holes: Inspect cones beforehand and discard any with cracks or holes
- Improper storage: Storing at room temperature will cause the whipped cream to collapse and the pudding to soften
- Overfilling the cones: Leave about 1/4 inch space at the top to prevent overflow and make eating easier
Storing Tips for the Recipe
These pudding ice cream cones are best enjoyed within 24 hours of preparation, but with proper storage techniques, you can extend their freshness:
- Store in the refrigerator in an airtight container with the cones standing upright
- For make-ahead prep, prepare the pudding mixture separately and store up to 3 days before filling cones
- Avoid freezing as this changes the texture of both the pudding and cones
- If preparing for a party, fill cones up to 6 hours in advance and add toppings just before serving
- To prevent condensation, allow to stand at room temperature for 5 minutes before serving from refrigeration
Conclusion
Decadent Pudding Cone Treats (Perfect Summer Dessert!) offer a delightful, no-bake solution to summer dessert dilemmas. With their customizable flavors, kid-friendly appeal, and nostalgic charm, they’re sure to become a favorite in your recipe collection. The beauty of these treats lies in their simplicity and versatility – perfect for everything from casual family nights to elaborate party dessert tables. Why not put your own spin on these creamy concoctions? Try different pudding flavors, experiment with unique toppings, or create themed variations for holidays and special occasions. We’d love to see your creative interpretations – share your pudding ice cream cones creations and let us know which flavor combinations were the biggest hit!
FAQs
Can I make these pudding cones ahead of time?
Yes, you can prepare them up to 24 hours in advance, but they’re best consumed within the first 6-8 hours for optimal cone crispness.
How do I prevent the cones from getting soggy?
Line the inside of each cone with a thin layer of melted chocolate and allow it to harden before adding pudding. This creates a moisture barrier.
Can I use homemade pudding instead of instant mix?
Absolutely! Homemade pudding works wonderfully, just ensure it’s cooled completely before folding in whipped cream.
Are there gluten-free options for the cones?
Yes, several brands now make gluten-free ice cream cones, or you can use gluten-free cookies shaped into cones as an alternative.
How can I make these more festive for a party?
Coordinate pudding colors and toppings with party themes – try blue pudding with white sprinkles for winter parties or green pudding with rainbow toppings for St. Patrick’s Day.